PyTorch 学习笔记
学习记录 PyTorch,记录开发学习过程
PyTorch 实操笔记
1. 简单介绍
- PyTorch 是一个深度学习框架,主要用于研究和生产环境
- 由Meta AI(Facebook)人工智能研究小组开发的一种基于Lua编写的Torch库的Python实现的深度学习库,目前被广泛应用于学术界和工业界,相较于Tensorflow2.x,PyTorch在API的设计上更加简洁、优雅和易懂。
2. 前置技术依赖
3. 环境配置
- 查看显卡 cuda 版本
| |
PyTorch 向下兼容 CUDA 版本,根据 CUDA 版本安装合适的 PyTorch 版本:
- 安装或更新 CUDA
2.1 通过官网安装 CUDA
在 CUDA 官网 下载并安装合适版本的 CUDA
2.2 Conda 安装 CUDA 工具包
- 这种方式可以为每个 Conda 环境单独安装 CUDA 版本,避免版本冲突
| |
- 安装 PyTorch
根据官网提供的安装命令安装 PyTorch
| |
4. 基础用法
4.1 张量
| |
| |
| 操作 | 是否创建新张量 | 是否共享内存 | 是否原地修改 | 备注 |
|---|---|---|---|---|
b = a | ❌ | ✅ | ❌ | 仅复制引用 |
b = a.clone() | ✅ | ❌ | ❌ | 深拷贝,新建 |
b.copy_(a) | ❌ | ❌ | ✅ | 原地复制数据 |
b = a[:] | ✅ | ✅ | ❌ | 浅拷贝(切片共享内存) |
b = a[[0, 2]] | ✅ | ❌ | ❌ | 花式索引,深拷贝 |
| |
| |
| |
4.2 自动求导
PyTorch 中,所有神经网络的核心是 autograd 包。autograd包为张量上的所有操作提供了自动求导机制。它是一个在运行时定义 ( define-by-run )的框架,这意味着反向传播是根据代码如何运行来决定的,并且每次迭代可以是不同的。
| |
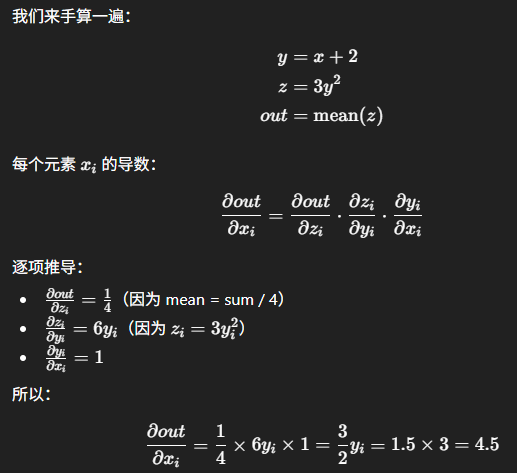
- 只有标量函数(即输出为单个元素的张量)的
.backward()方法才能被调用。如上例中,out 为 z 的均值,z 中每一个元素对 out 的梯度贡献均等,因此 x.grad 中的元素均为 18/4=4.5 。
| |
| |
| |
| |
| |
4.3 并行计算 CUDA
我们可以使用 .cuda() 方法将模型、张量或数据移动到 GPU 上进行计算:
| |
4.4 概率
| |
4.5 查看函数用法
| |
5. 深度学习整体流程
| 阶段 | 核心内容 | 关键说明 |
|---|---|---|
| 1. 数据准备 | 加载与预处理数据 | 使用 Dataset 与 DataLoader,进行划分(train/val/test)与归一化、增强等处理 |
| 2. 模型定义 | 构建神经网络结构 | 继承 nn.Module,在 forward() 定义前向传播 |
| 3. 损失函数 | 选择优化目标 | 常用:分类用 CrossEntropyLoss,回归用 MSELoss |
| 4. 优化器设置 | 定义参数更新规则 | 如 Adam、SGD,指定学习率与权重衰减 |
| 5. 训练循环 | 前向传播 → 计算损失 → 反向传播 → 更新参数 | 核心训练逻辑,包含梯度清零与反向传播 |
| 6. 验证评估 | 在验证集上测试模型性能 | 关闭梯度计算,评估准确率、损失等指标 |
| 7. 模型保存 | 保存最佳模型权重 | 使用 torch.save(model.state_dict(), path) |
| 8. 测试与推理 | 使用训练好的模型预测 | 加载权重后在新数据上进行 model.eval() 推理 |
5.1 线性回归
- 线性模型

- 损失函数
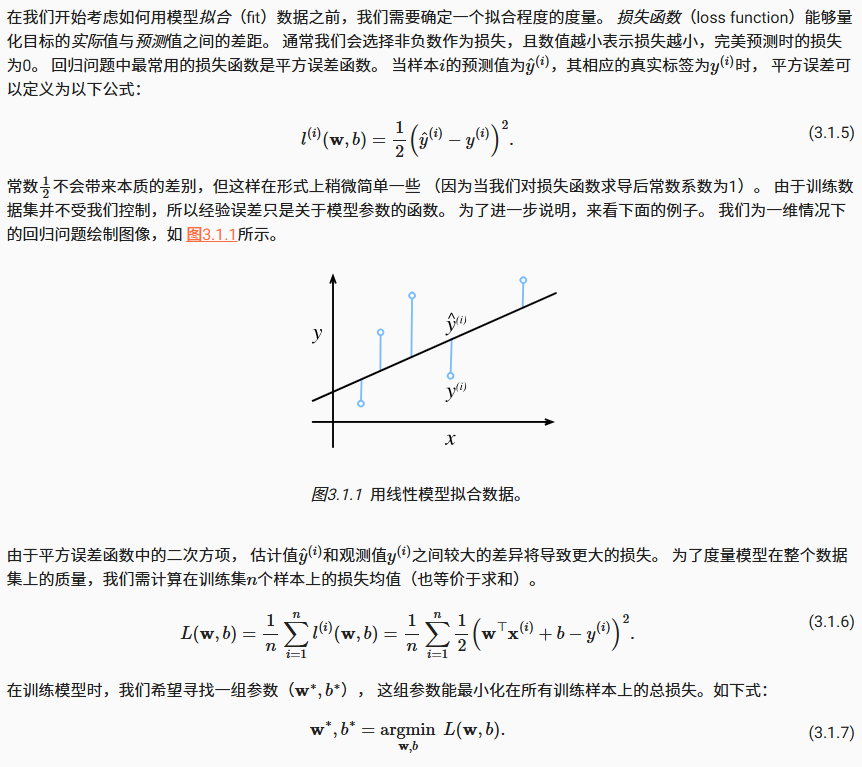
- 梯度下降
5.2 模型预测
给定“已学习”的线性回归模型 $\hat{\mathbf{w}}^{\mathrm{T}} \mathbf{x} + \hat{b}$ , 现在我们可以通过房屋面积$x_1$和房龄$x_2$来估计一个(未包含在训练数据中的)新房屋价格。 给定特征估计目标的过程通常称为预测(prediction)或推断(inference)。
- 矢量化加速
- 标量计算:逐个样本计算预测值 (for 循环)
- 矢量化计算:通过矩阵运算一次性计算多个样本的预测值
- 对计算进行矢量化,时处理整个小批量的样本
| |
- 正态分布与平方损失
- 随机变量 $x$ 服从均值为 $\mu$ 、方差为 $\sigma^2$ 的正态分布,记为 $x \sim \mathcal{N}(\mu, \sigma^2)$ ,其概率密度函数为: $$p(x) = \frac{1}{\sqrt{2\pi\sigma^2}}\exp\left(-\frac{(x-\mu)^2}{2\sigma^2}\right)$$
| |
5.3 线性回归的 nn 典型实现
1️⃣ 简要概括典型结构
一个典型的线性回归神经网络结构主要包括:
- 数据集(Dataset & DataLoader):生成或读取训练数据,并按 batch 迭代
- 模型(Model):核心层是
nn.Linear,表示线性映射 (y = Xw + b) - 损失函数(Loss):回归问题常用 MSELoss 或 L1Loss
- 优化器(Optimizer):更新参数 w、b,常用 SGD 或 Adam
总体结构: 数据 → 模型前向 → 损失计算 → 反向传播 → 参数更新
2️⃣ 每一部分的具体代码实现
数据集与 DataLoader
| |
模型定义
方法 A:继承 nn.Module
| |
方法 B:nn.Sequential
| |
损失函数
| |
优化器
| |
3️⃣ 带实际例子的完整实现
| |
4️⃣ 注意事项
梯度清空
- 每次更新前必须调用
optimizer.zero_grad()或手动清零param.grad - 否则梯度会累加,导致参数更新过大
- 每次更新前必须调用
学习率选择
- lr 太大 → 训练不稳定
- lr 太小 → 收敛慢
Batch 平均梯度
- 使用小批量时,梯度通常按 batch 平均更新
- 保持更新幅度稳定
模型参数访问
model.parameters()→ 所有可训练参数param.grad→ 当前 batch 的梯度
数据维度
- 输入 X shape
[batch_size, n_features] - 输出 y shape
[batch_size, 1]
- 输入 X shape
5.4 softmax 回归的 nn 典型实现
| |
5.5 多层感知机(multilayer perceptron,MLP)
- 为什么要用多层感知机(MLP)
- 单层线性层只能做直线映射,无法处理复杂非线性关系。
- 加了隐藏层 + 非线性激活函数后,网络可以拟合复杂函数。
- 理论上:单隐层+足够神经元能逼近任意函数,但训练困难。
- 深层网络更高效:用更少神经元就能表达复杂模式。
- 激活函数
- 是神经元输出的“变形器”,把输入映射成输出。
- 主要作用:
- 引入非线性,让网络能处理复杂关系。
- 控制输出范围。
- 常见类型:
- Sigmoid:0~1,适合概率
- Tanh:-1~1
- ReLU:负数→0,正数→原值
- Leaky ReLU/GELU/Softmax:不同改进或多分类用
- 激活值
- 神经元经过激活函数后的输出。
- 输出越大 → “活跃”,输出小或0 → “不活跃”。
- 和权重不同,它是神经元对输入的响应。
顺便说一句,这些知识已经让你掌握了一个类似于1990年左右深度学习从业者的工具。
红温了👆
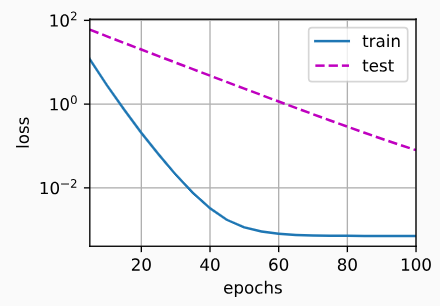
5.6 模型选择、欠拟合和过拟合
我们不想让模型只会做这样的事情:“那是鲍勃!我记得他!他有痴呆症!”。 原因很简单:当我们将来部署该模型时,模型需要判断从未见过的患者。 只有当模型真正发现了一种泛化模式时,才会作出有效的预测。 更正式地说,我们的目标是发现某些模式, 这些模式捕捉到了我们训练集潜在总体的规律。 如果成功做到了这点,即使是对以前从未遇到过的个体, 模型也可以成功地评估风险。 如何发现可以泛化的模式是机器学习的根本问题。
深度学习的目标是拟合输入与输出之间的潜在规律(可泛化模式),而非训练集特定的偶然特性。过拟合是模型对训练集偶然特性过度拟合的结果,本质上不是规律,而是对噪声的“误学习”。数据设计不合理或噪声过多会加剧这种误学习,使之在最后临门一脚时远离真正的规律。
假设硬币是公平的,无论我们想出什么算法,泛化误差始终是0.5。 然而,对于大多数算法,我们应该期望训练误差会更低(取决于运气)。 考虑数据集{0,1,1,1,0,1}。 我们的算法不需要额外的特征,将倾向于总是预测多数类, 从我们有限的样本来看,它似乎是1占主流。 在这种情况下,总是预测类1的模型将产生0.33的误差, 这比我们的泛化误差要好得多。 当我们逐渐增加数据量,正面比例明显偏离0.5时,这种情况 的可能性将会降低, 我们的训练误差将与泛化误差相匹配。
在许多实际问题中,目标本身可能存在随机性或噪声(前者类似经典物理中的复杂因素,后者类似量子力学的不确定性),导致训练集和测试集即使来自同一分布,也无法完全一致。这种固有的不确定性构成了不可约误差,是泛化误差的一部分。换句话说,模型无法完全重建目标规律,只能在有限样本和有限模型容量条件下尽可能逼近数据分布中的潜在规律。训练误差与泛化误差之间的差异还会受到样本有限性和模型容量限制的影响。随着训练数据量增加,训练误差通常会逐渐接近泛化误差,但不可约误差始终存在,因此泛化误差几乎总是大于零。

5.7 权重衰减
一种简单的方法是通过线性函数 $f(x)=w^Tx$ 中的权重向量的某个范数来度量其复杂性, 例如 $||w||^2$ 。 要保证权重向量比较小, 最常用方法是将其范数作为惩罚项加到最小化损失的问题中。 将原来的训练目标最小化训练标签上的预测损失, 调整为最小化预测损失和惩罚项之和。 现在,如果我们的权重向量增长的太大, 我们的学习算法可能会更集中于最小化权重范数 $||w||^2$ 。这正是我们想要的.
在神经网络中,权重向量越大,模型对输入变化越敏感,函数曲线更陡峭,能表达更多复杂模式,函数族复杂度高,容易过拟合。L2正则化(权重衰减)通过在损失函数中加入权重平方的惩罚项,限制权重增长,使输出平滑,降低模型复杂度,从而提高泛化能力。
此外,为什么我们首先使用 $L_2$ 范数,而不是 $L_1$ 范数。事实上,这个选择在整个统计领域中都是有效的和受欢迎的。$L_2$ 正则化线性模型构成经典的岭回归(ridge regression)算法,$L_1$ 正则化线性回归是统计学中类似的基本模型,通常被称为套索回归(lasso regression)。 使用 $L_2$ 范数的一个原因是它对权重向量的大分量施加了巨大的惩罚。 这使得我们的学习算法偏向于在大量特征上均匀分布权重的模型。 在实践中,这可能使它们对单个变量中的观测误差更为稳定。 相比之下,$L_1$ 惩罚会导致模型将权重集中在一小部分特征上, 而将其他权重清除为零。 这称为特征选择(feature selection),这可能是其他场景下需要的。
L2 范数正则化(岭回归)会均匀压缩所有特征的权重,使模型平稳、对噪声不敏感,因此通常优先使用;而 L1 范数正则化(套索回归)会将部分权重压为零,实现特征选择,适合需要筛掉不重要特征的场景。
| |
| |
| |
5.8 暂退法
泛化性和灵活性之间的这种基本权衡被描述为偏差-方差权衡(bias-variance tradeoff)。 线性模型有很高的偏差:它们只能表示一小类函数。 然而,这些模型的方差很低:它们在不同的随机数据样本上可以得出相似的结果。
深度神经网络位于偏差-方差谱的另一端。 与线性模型不同,神经网络并不局限于单独查看每个特征,而是学习特征之间的交互。 例如,神经网络可能推断“尼日利亚”和“西联汇款”一起出现在电子邮件中表示垃圾邮件, 但单独出现则不表示垃圾邮件。
简单性的另一个角度是平滑性,即函数不应该对其输入的微小变化敏感。 例如,当我们对图像进行分类时,我们预计向像素添加一些随机噪声应该是基本无影响的。 1995年,克里斯托弗·毕晓普证明了 具有输入噪声的训练等价于Tikhonov正则化 (Bishop, 1995)。 这项工作用数学证实了“要求函数光滑”和“要求函数对输入的随机噪声具有适应性”之间的联系。
泛化与特征选择:模型只有关注真实、稳定的特征,而忽略噪声特征,才能具有良好的泛化能力。在深度神经网络中,噪声特征对输出的影响应尽可能微小,从而保证模型在未见数据上的稳健性。
这个想法被称为暂退法(dropout)。 暂退法在前向传播过程中,计算每一内部层的同时注入噪声,这已经成为训练神经网络的常用技术。 这种方法之所以被称为暂退法,因为我们从表面上看是在训练过程中丢弃(drop out)一些神经元。 在整个训练过程的每一次迭代中,标准暂退法包括在计算下一层之前将当前层中的一些节点置零。
需要说明的是,暂退法的原始论文提到了一个关于有性繁殖的类比: 神经网络过拟合与每一层都依赖于前一层激活值相关,称这种情况为“共适应性”。 作者认为,暂退法会破坏共适应性,就像有性生殖会破坏共适应的基因一样。
在训练中随机破坏部分神经元的共适应性,使模型不依赖特定神经元组合,从而忽略训练集中的噪声或无关特征,提高泛化能力。
| |
调整 dropout 比例可以控制正则化强度,通常在 0.2-0.5 之间选择。过高会导致欠拟合,过低则正则化效果不明显,这就是调参吧。
5.9 前向传播与反向传播
- 前向传播在神经网络定义的计算图中按顺序计算和存储中间变量,它的顺序是从输入层到输出层。
- 反向传播按相反的顺序(从输出层到输入层)计算和存储神经网络的中间变量和参数的梯度。
- 在训练深度学习模型时,前向传播和反向传播是相互依赖的。
- 训练比预测需要更多的内存。
前向传播定义了目标函数在当前参数处的取值,用于计算模型输出和损失,并构建计算图;反向传播计算该目标函数在参数空间中的一阶导数,在该计算图上应用链式法则,计算损失对各参数的梯度,而学习过程本质上是在参数空间中沿负梯度方向进行迭代优化。
5.10 数值稳定性和模型初始化
5.10.1 梯度消失与爆炸
在深度神经网络中,参数更新依赖反向传播得到的梯度,而梯度必须按链式法则从后向前逐层相乘传播;由于越靠前的层离损失函数越远,其梯度要经历更多层的导数“缩放”,如果每层的梯度因子(权重大小与激活函数导数)整体小于 1,就会在连乘中迅速衰减,导致前面层梯度接近 0、参数几乎不更新,这就是梯度消失;反之,如果这些因子整体大于 1,梯度会在连乘中指数放大,使参数一次更新就发生剧烈变化甚至数值溢出,这就是梯度爆炸;因此,常见现象是后面层因路径短仍能正常更新,而前面层因路径长率先“学不动”,而真正的模型收敛应表现为在损失已足够低的前提下所有层梯度同时变小。
5.10.2 权重初始化
在多层感知机中,隐藏单元在同一层的权重如果完全相同,前向传播会产生相同激活,反向传播的梯度也相同,导致这些神经元始终沿同一方向更新,相当于浪费了隐藏单元的容量,网络表达能力受限。随机初始化打破这种对称性,使每个隐藏单元获得不同起点,前向输出和梯度逐渐分化,从而学习到不同的特征组合,提升网络的表达能力和泛化性能。
Xavier 初始化通过根据输入输出神经元数量合理随机化权重,既打破对称性,又控制每层输出方差,防止梯度消失或爆炸,使深层网络训练更稳定。